


The power of micro frontends – How to dynamically extend Cumulocity IoT Frontends

Introduction

Micro frontends sound like the next buzzword. But it follows the same reasoning as microservices for the backend: loosely coupled functionality that can be developed and deployed independently. It is the de facto standard to avoid monolith and deep integration to allow better distribution of resources for developing and running that functionality.
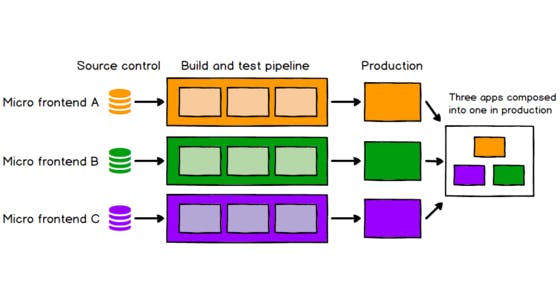
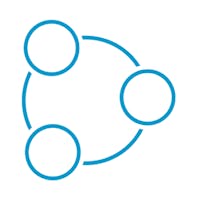
Image 1: Separation of micro frontends allows self-empowered teams. (by: Martin Fowler)
As application complexity increases, frontends are getting more and more complex. The same applies to Cumulocity frontends. However, Cumulocity in fact already follows a micro frontends architecture. To understand how, we first need to explain, what are the possibilities of building a micro frontend architecture:
Option 1. Server side: This is basically the classic approach of a page loaded on a different URL. You could serve unique frontends from different teams (even on separate web servers) on each URL. This already fulfills all the requirements of a micro frontend, as it is loosely coupled, independently developable, and separately deployable. However, there are challenges when using this approach e.g. how to communicate between the different micro frontends and how to ensure a similar look and feel across the other frontends.
→ Cumulocity allows using micro frontends already by the application hosting. You can deploy different frontends via the application API and switch between them via the app switcher. When using the Web SDK, you ensure the same look and feel across all applications.
Option 2. Compile time: Another solution to allow a micro frontend architecture is to bundle and build your micro frontend as a library and provide it (for example with npm). Those packages can then be used to compose or build a new application. This has many benefits, as the developer has full control. The communication can be clearly defined and the look and feel could be aligned. However, it requires a new build each time one of the components changes. The coupling, therefore, is much closer.
→ Cumulocity provides different NPM modules which let you use this approach. You can e.g. only use the API client, a default application with the styling, or import different features as Angular modules from our components library. Take a look at NPM to see all provided libraries.
Option 3. Run time: Providing different frontends dynamically while the app is running. You could load different parts of an application in an iframe or only load a script bundle from a different server. However, the communication and coupling with e.g. an iframe is nearly as hard as when using the server-side integration. Therefore the runtime integration is more than just rendering part of the website from an external source. It allows deep plugging into the application and shares e.g. communication or state layer. New technologies like Module Federation allow to share certain dependencies and define their scope, to allow exactly that.
→ With version 10.16.0.0 we just introduced a new plugin concept into Cumulocity which gives you the ability to extend any Web SDK-based application at run time.
As shown, Cumulocity is already based on a micro frontend architecture. In fact, option 1. is a concept of the Platform since the beginning, and option 2. was introduced in 2018. However, we understand the need for the run time extension of applications and therefore are proud to present the new concept for option 3. in the next chapter.
Introducing plugins: Dynamically extending Cumulocity web apps
Plugins are a new concept to dynamically load features at run time and allow an extension of any Web SDK-based web application. The user story is simple:
Open Administration
Clone the application you want to extend, let’s say you clone “Cockpit”
Open the Cockpit application details in Administration and select the tab “Plugins”
Hit install plugins and select a plugin
→ When you now check the application, it is extended by the plugin you choose.

Image 2: Shows how to add the example bookmark plugin to a cloned Cockpit application.
What happens here is a simple script injection. The Cockpit application will now request a script called remoteEntry.js from the plugin. In terms of micro frontend, the application that does the call is called the shell which injects the remote into its scope.
Tip: If you ever have any issue with an application including a plugin, you can exclude all plugins by using
?noPlugins=truequery parameter.
Those plugins can use any of the concepts that are integrated into the Web SDK. From just adding a certain button on a device to a full feature set with its own navigator node, route, and component. The possibilities are endless but opinionated. Meaning you can only use the borders of the Web SDK. We will not support e.g. React or Vue. When you want to use other frameworks, consider our compile-time integration.
We decided to be opinionated here to give the same developer experience as we use to build current Angular applications. As a developer, you can start your first plugin simply by using the c8ycli nearly the same way as you can build a new application. In the next chapter, we will build our first plugin.
Build your own plugin
In this chapter, we will spin up the simple pre-build widget example. There is a more detailed example on our github.
Pre-requirements for your machine are the following software to be installed:
→ NodeJS version 14
→ Web SDK at least 1016.0.0 (meaning using the npm packages @c8y/cli, @c8y/ngx-components etc. in version => 1016.0.0)
Step 1: Setting it up
npx @c8y/cli@1016.129.0 new
This will start the scaffolding process. Select a name, the “next” version (as of writing 1016.66.0) and as a base project widget-plugin. The @c8y/cli will now scaffold you with a simple widget example. You can start this example by running npm start, but as there is no dashboard module imported, you will not be able to see the widget. However, there is a new command which allows us to debug the plugin.
Step 2: using --shell
Take a closer look at the package.json start script. As you can see it simply spins up the development server by running c8ycli server. You should add where to proxy the backend to by adding the -u flag. But also you can add a new flag that allows you to debug your “remote” plugins in a “shell” application:
{[...]"scripts": {"start": "c8ycli server -u http://yourinstance.cumulocity.com --shell cockpit"[...]}}
Using this will give you a new link to the cockpit application as soon as you run npm start. This link can be used to check your plugin (remote) directly in the cockpit (shell) application. You can define any deployed application on your tenant via the contextPath of those applications.
Step 3: Exporting the module you want to share
When you check again the package.json you will see two new entries in the c8y.app entry:
"isPackage": true,"package": "plugin","exports": [{"name": "Example widget plugin","module": "WidgetPluginModule","path": "./widget/widget-plugin.module.ts","description": "Adds a custom widget to the shell application"}]
Exports: Here you can put one or multiple Angular modules. Each of them is counted as a plugin and the name and description is shown to the enduser in the application.
Package: There are two types of packages that will be further explained in the next chapter. You can ignore it for now.
isPackage: Tells that this is a package. A package is a combination of multiple plugins.
The important part is the path of the module. This is your remote module, which will be lazy-loaded into the shell application. Everything you put into this module will be added to the application. You can use the HOOK concept of ngx-components to extend many base navigation elements or to add new ones.
The base app.module will not be used in the plugin. As this module is lazy-loaded, you need to remember the different injector scopes. A lazy-loaded route gets a new injector and therefore you should not use any forRoot() call that is already used in the shell app. In the default case, this is only the case for the Angular RouterModule. You can add routes in this module by using the forChild() static method of the RouterModule.
Step 4: Deploying
In deploying there is no difference from a default application. You can run npm run deploy or run npx c8ycli deploy after you build the application with npm run build or npx c8ycli build. When you do so, you will find your application not in the default view, but in the packages tab.
This is it: You can use the plugin now in any custom application. However, you cannot see the application in the default view. You need to use the new package-view, which is explained in detail later.
Introducing packages: Manage versions and hosting of micro frontends
As you have seen in the previous chapter, the development of a plugin is quite similar to the development of a custom extension. The story did not change. However, we introduced a new type of application called package to solve two major problems:
The ability to have multiple separate functionalities delivered with one micro frontend. E.g. yeven ou can build one plugin that allows you to configure a map widget and another plugin actually containing the map widget. Maybe those plugins will even be added to different shell applications, but they belong logically together.
Updating micro frontends isn’t easy and you could easily get into version conflicts. Packages can be versioned and therefore allow you to specify exactly the version you want to use.
Packages are defined in the application manifest and versions as well. When the already above shown isPackage flag is set to true the application will be shown in the new view:
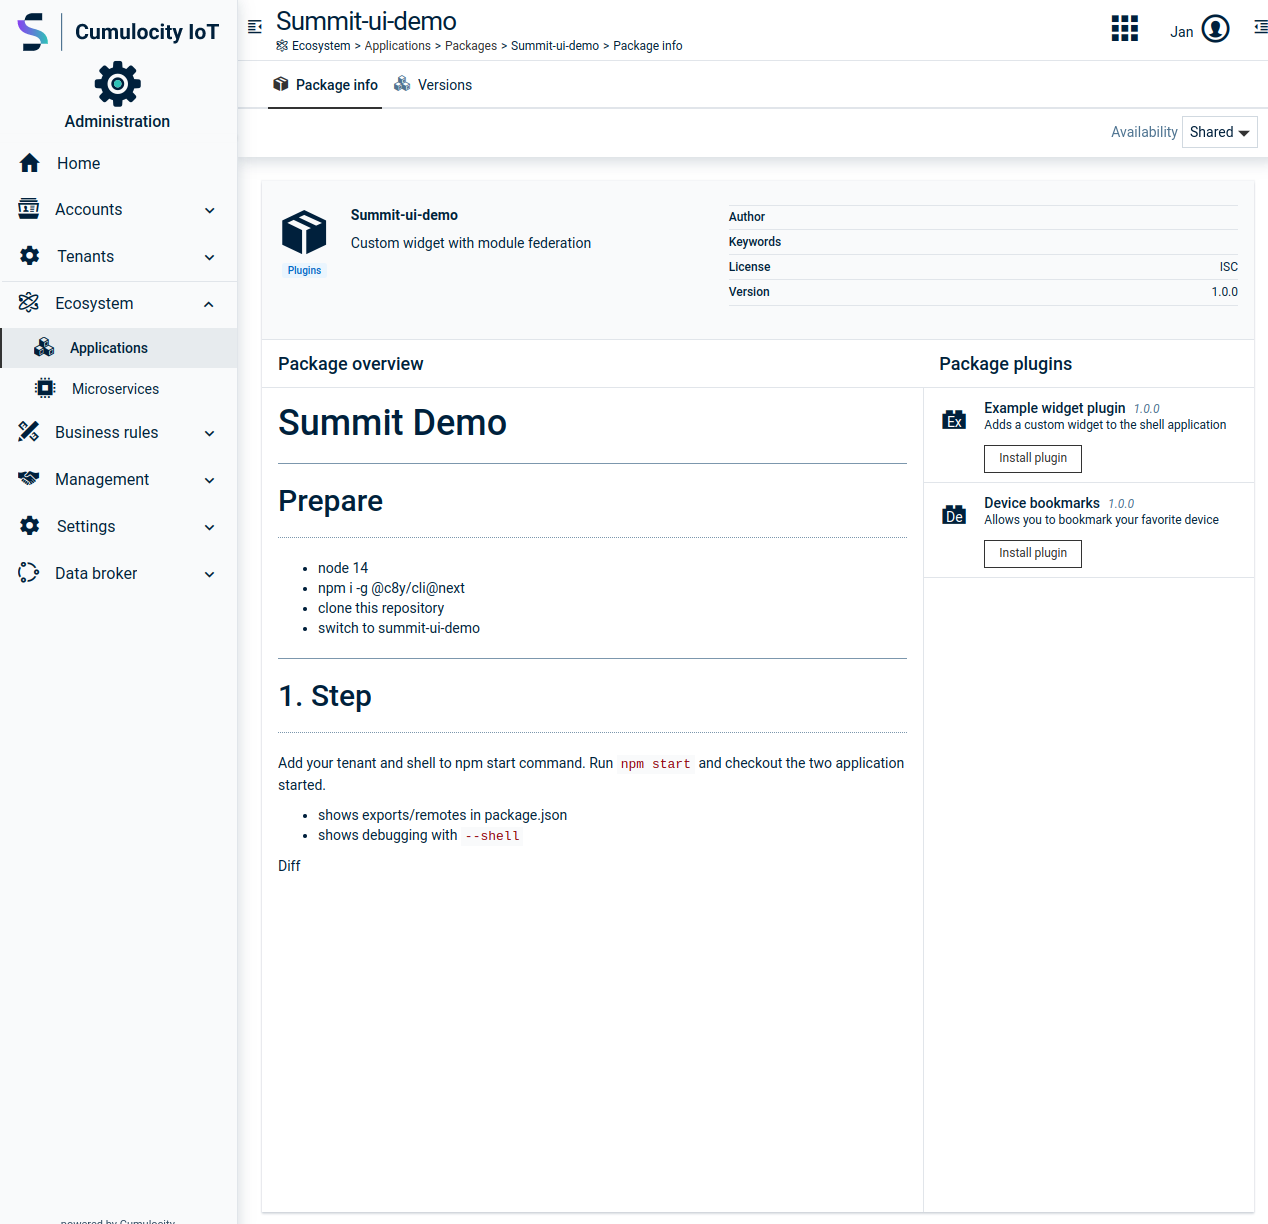
Image 3: Detail view of a package. The readme.md file of a package can be used to inform the user of the content of the package.
Additionally, the versioning API is used, and therefore also the package.json version is used. You can manage versions in the versions tab of a detailed application view:

Image 4: Detail view of the versions. The latest tag can be changed in this view.
All packages act like hosted applications and can therefore be accessed via the /apps/{{context-path}} URL. The versioning can be used, which allows you to have different versions running at the same time. Let’s imagine you uploaded 3 different versions of a package called plugin-example, 1.0, 1.1 and 1.2. These different apps can be resolved via the contextPath:
/apps/plugin-example@1.0/cumulocity.json --> shows the manifest file of version 1.0 /apps/plugin-example@1.1/cumulocity.json --> shows the manifest file of version 1.1 /apps/plugin-example@1.2/cumulocity.json --> shows the manifest file of version 1.2
Additionally, you can use tags for versions. That allows you to define tags like beta or stable which always resolve to the version that was tagged with it. There is one special tag called latest that allows to resolve the URL without any version. Again an example: Let’s imagine we tagged version 1.1 with “latest” and version 1.2 with “beta”:
/apps/plugin-example@1.0/cumulocity.json --> shows the manifest file of version 1.0 /apps/plugin-example@1.1/cumulocity.json --> shows the manifest file of version 1.1 /apps/plugin-example/cumulocity.json --> shows the manifest file of version 1.1 /apps/plugin-example@beta/cumulocity.json --> shows the manifest file of version 1.2
As shown with the new versioning API you can ensure that plugins can be seamlessly updated without risking a breaking application. The question remains, how to distribute those packages to all sub-tenants to fulfill a self-service approach?
Shared availability
A new availability option can now be configured for packages. This availability lets apps be visible to any subtenant without subscribing. You can consider it as a marketplace approach. Any subtenant can browse the shared packages and decide on its own if it wants to install it. See the following tree to understand better, how apps are shared between tenants. Imagine each tenant uploads one shared package with the mentioned name:

As seen, shared availability can help you distribute packages to all sub-tenants. Each uploaded shared package, is available for the current tenant and all of its child tenants. This allows to the provision of a self-service approach, as the child tenants can browse the information in the packages and decide on their own to install them. This actually is only supported for hosted packages. But you can not only share plugins this way, as packages can also contain blueprints.
Introducing blueprints: Full applications distributed as packages
Imagine you don’t only want to distribute a plugin to all your tenants. Instead, you want to share with them an application, that they might want to install. Think of a ready-made solution, e.g. for water management or smart city management. This ready-build solution is not just plugins to Cockpit or any other app. They are complete solutions. But mostly these ready-made solutions are not needed by all tenants. So uploading them as applications and sharing them with all tenants is mostly not wanted. When you define your package as a blueprint you can achieve this. The package does not only provide plugins, it also is able to get installed:

Image 4: Detail view of a blueprint. Notice the “deploy application” button.
Additionally to the ability to deploy and share those packages, also versioning is active. As soon as the package and deployed application versioning get out of sync, the user is informed that an update is available and can simply update the application by clicking a button.
To complete the perfect blueprint you can additionally add a setup wizard. Therefore we introduced a new hook called HOOK_STEPPER and a setup stepper which let you spin up an installation wizard on each start. You can already try out this installation wizard by opening Cockpit with the ?forceSetup=true query parameter.
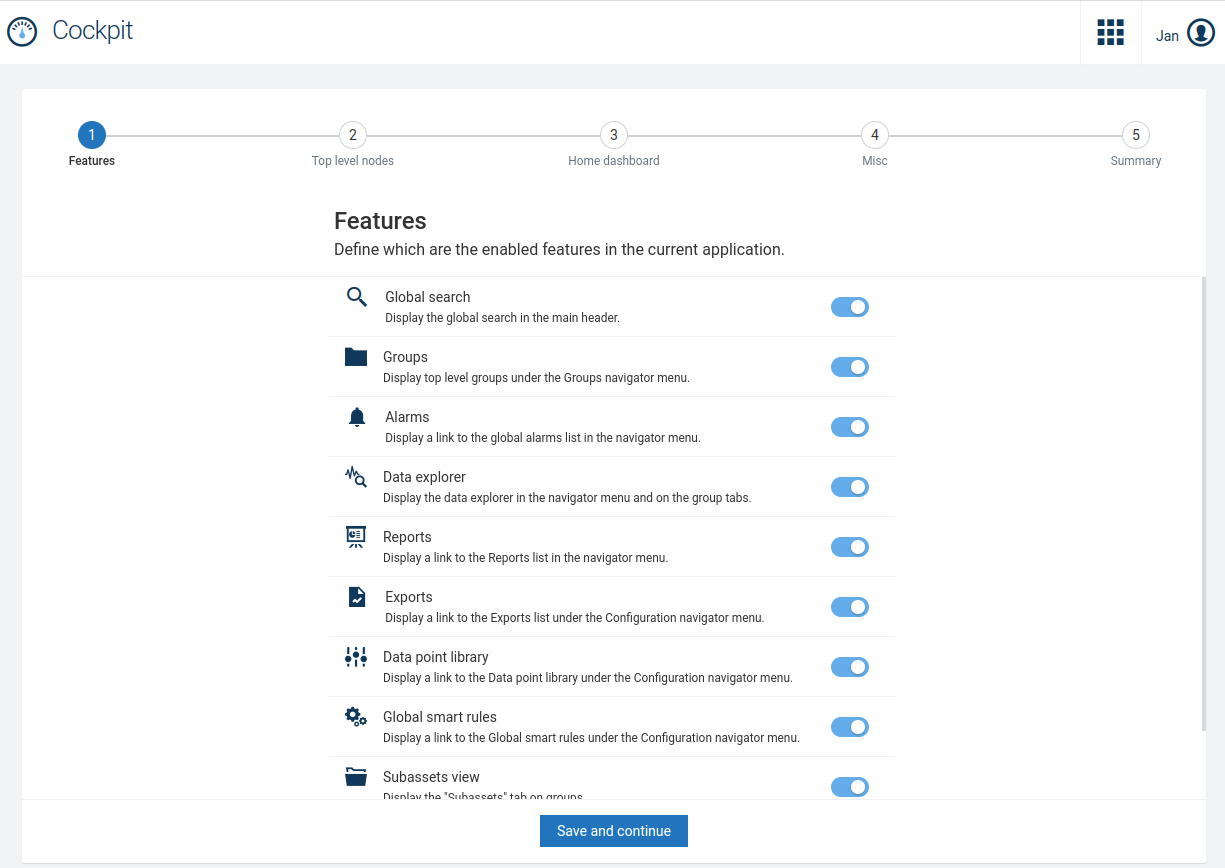
Image 5: The installation wizard of Cockpit.
As this is a HOOK, even Plugins and Blueprints can share the installation wizard and use it together.
Conclusion
Whatever you choose to extend the IoT Frontends of Cumulocity is up to you. The only hosted approach lets you choose whatever fits best your team skills. Do you want to use react? Fine, use the server-side hosting. However, our opinionated libraries based on Angular help you get things done quicker, as e.g. branding and login are already included. Additionally, with the new packages and run-time support, you enable yourself to extend any app with a self-service approach. Especially for resellers, we see big benefits in building ready-made plugins or blueprints that exactly fit the needs of the customers.
Related resources
This article is part of the TECHniques newsletter blog - technical tips and tricks for the Software AG community. Subscribe to receive our quarterly updates or read the latest issue.