Creating a webMethods.io REST connector for Salesforce Composite Graph

Discover, Share, and Collaborate with the Software AG Tech Community
The Software AG Tech Community is your single best source for expert insights, getting the latest product updates, demos, trial downloads, documentation, code samples, videos and topical articles.
But even more important, this community is tailored to meet your needs to improve productivity, accelerate development, solve problems, and achieve your goals.
Join our dynamic group of users who rely on Software AG solutions every day, follow the link or you can even sign up and get access to Software AG's Developer Community.
Thanks for stopping by, we hope to meet you soon.
products versions - {webMethods.io Integration [10.16.0.0]}
Introduction
Salesforce provides a composite graph API that allows you to process multiple graphs in a single request. Each graph can contain several composite requests, and each composite request can have multiple Salesforce objects to process. For more details on the composite graph, please refer to this link.
Here is an example of a Composite Graph request:
This request consists of two graphs.
The first graph contains a composite request to create an Account object, followed by the creation of a Contact and an Opportunity object, both referring to the newly created Account ID. This creates a relationship between the three objects.
The second graph contains a composite request to create an Account and a Contact. The Contact is attached to the newly created Account.

{
  "graphs": [
    {
      "graphId": "1",
      "compositeRequest": [
        {
          "url": "/services/data/v57.0/sobjects/Account/",
          "body": {
            "name": "Company ABC"
          },
          "method": "POST",
          "referenceId": "reference_id_account_1"
        },
        {
          "url": "/services/data/v57.0/sobjects/Contact/",
          "body": {
            "FirstName": "Tarak",
            "LastName": "Konar",
            "AccountId": "@{reference_id_account_1.id}"
          },
          "method": "POST",
          "referenceId": "reference_id_contact_1"
        },
        {
          "url": "/services/data/v57.0/sobjects/Opportunity/",
          "body": {
            "CloseDate": "2023-11-10",
            "StageName": "Prospecting",
            "Name": "Opportunity to implement Composite Graph",
            "AccountId": "@{reference_id_account_1.id}"
          },
          "method": "POST",
          "referenceId": "reference_id_opportunity_1"
        }
      ]
    },
    {
      "graphId": "2",
      "compositeRequest": [
        {
          "url": "/services/data/v57.0/sobjects/Account/",
          "body": {
            "name": "Company DEF"
          },
          "method": "POST",
          "referenceId": "reference_id_account_2"
        },
        {
          "url": "/services/data/v57.0/sobjects/Contact/",
          "body": {
            "FirstName": "Rajiv",
            "LastName": "Asher",
            "AccountId": "@{reference_id_account_2.id}"
          },
          "method": "POST",
          "referenceId": "reference_id_contact_2"
        }
      ]
    }
  ]
}
This article will guide you through the step-by-step process of creating the webMethods.io Integration REST API connector for Salesforce Composite Graph. We will then demonstrate how to use this reusable connector in a webMethods.io Integration flow service to call the Salesforce Composite Graph API.
Pre-requisite
There are two main prerequisites that you need to fulfill in order to implement this.
webMethods.io integration tenant access and basic knowledge
Firstly, you should have access to a webMethods.io Integration tenant and have a basic understanding of webMethods.io Integration. If you are a beginner and need guidance on how to get a free-forever tenant on webMethods.io and start learning from beginner to advanced, please refer to the knowledge article first.
Create an App in Salesforce and get all credentials for OAuth
Secondly, you should have access to Salesforce and be able to create an App to obtain a Client ID, Secret, and refresh token for OAuth 2.0.
Steps to follow
Create REST API connector in webMethods.io Integration
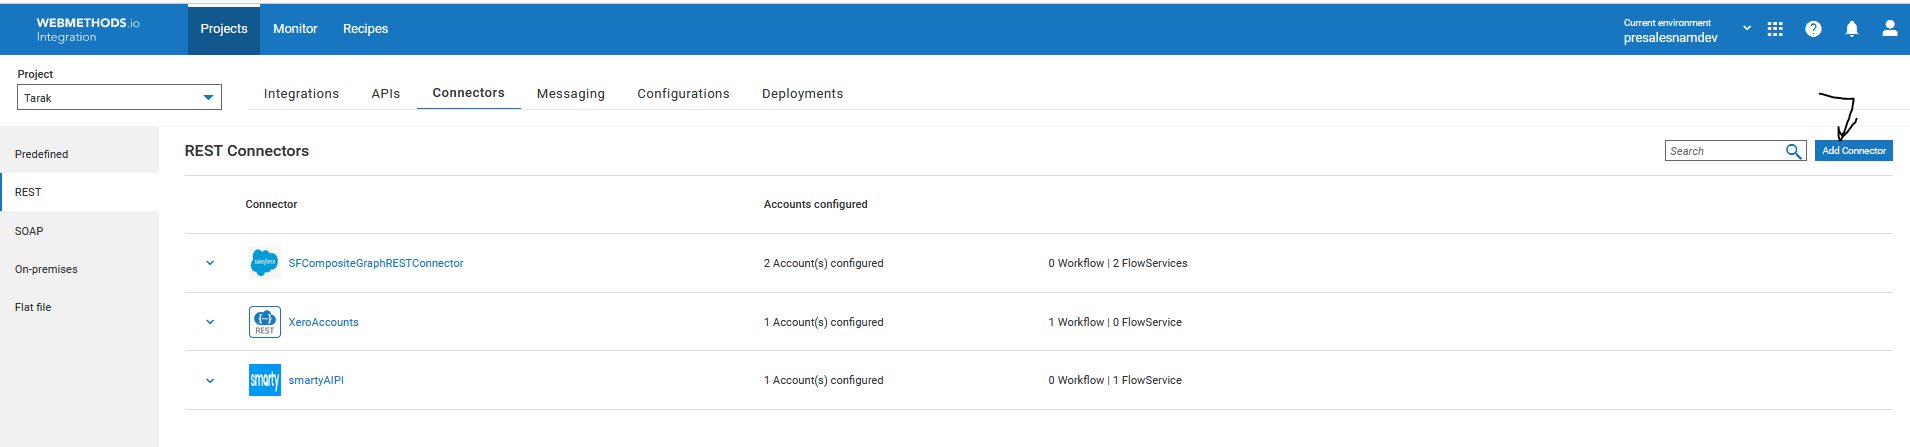
- Log in to your
webMethods.ioIntegration tenant, open your project and go to the connectors tab.

- Left-hand side, you can see all the different types of connectors. Predefined, REST, SOAP, On-premises, Flat File. Please go to REST connector as we will be creating a new REST connector to work with Salesforce composite graph.

- Please click on “Add Connector” located at the top right corner.
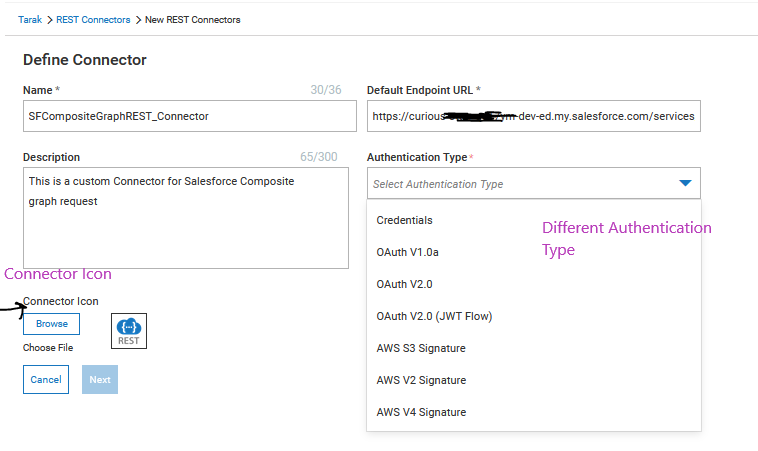
- Provide a name of the custom REST API connector, default endpoint URL, Description, Authentication type and select an icon for the connector ( it should be in png format).
The default endpoint URL will be your Salesforce env URL (e.g- https://curious-xxxxx-xxxym-dev-ed.my.salesforce.com/services/data/v57.0)
As Salesforce composite graph APIs use Oauth, will select Oauth V2.0 here. Then click Next.

- On the next screen, will add resources. For composite graph, all calls should go to /composite/graph. So will add resources with path /composite/graph. This path will add to the base URL. We will provide a base URL as input while creating an account to connect to a specific Salesforce instance.
Please click “Add resource” on the top right.

Then provide Name, path, any description, and what methods are allowed for this resource. As composite graph takes post request, will select method post

- On the next screen, will select request parameters, headers and body content format.
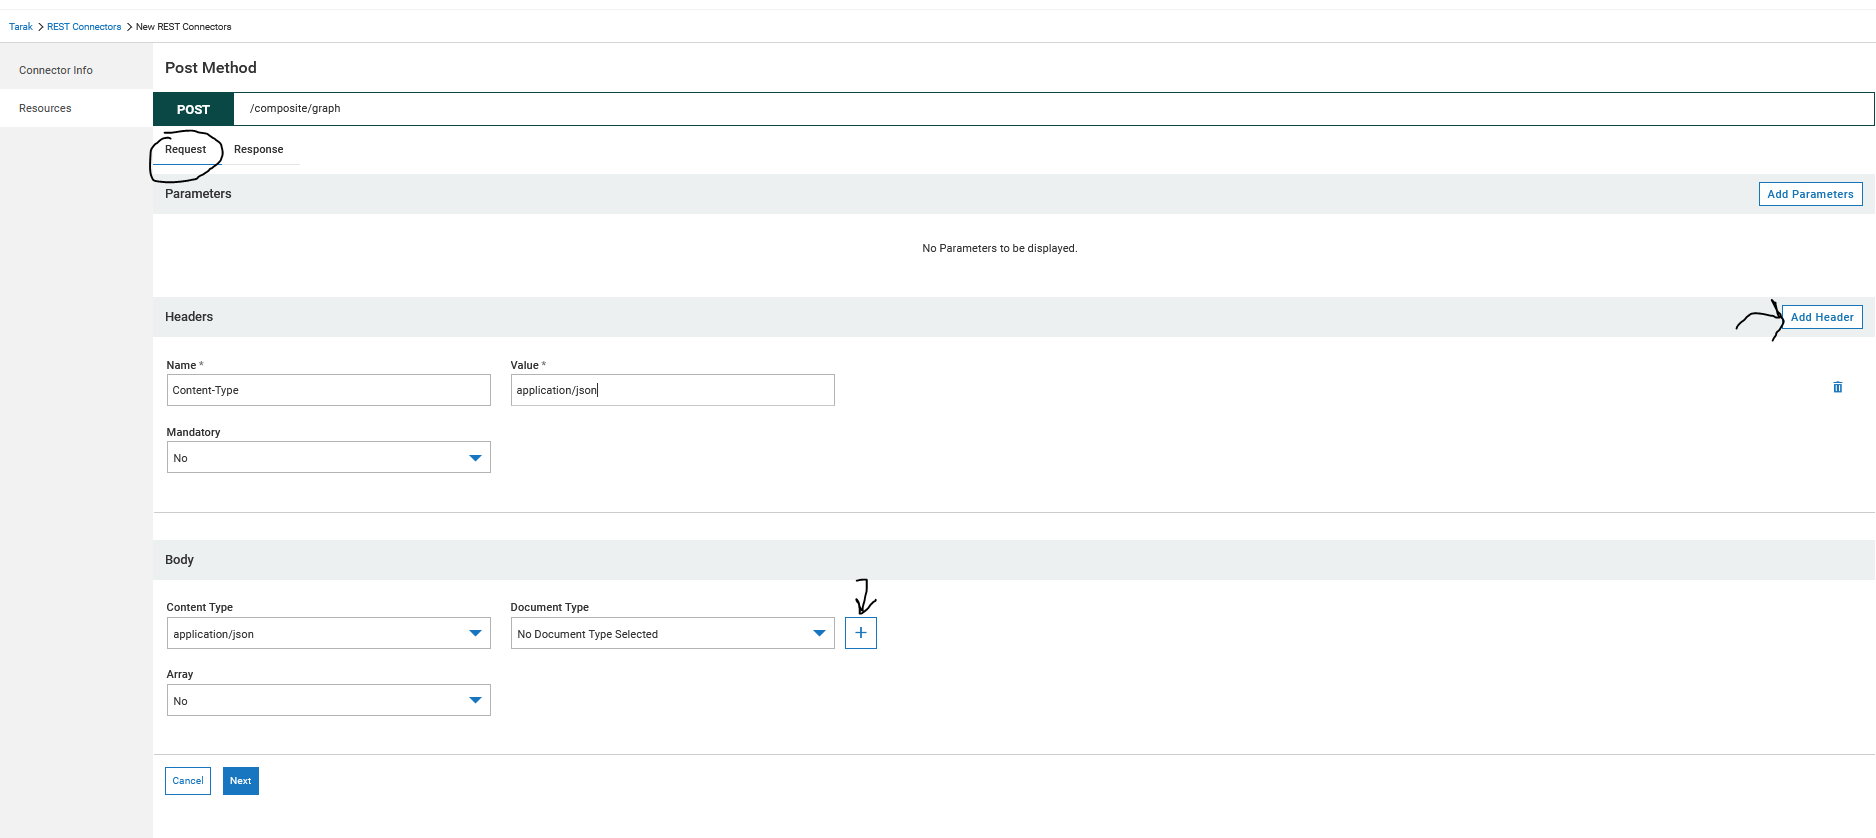
For body content, will create a structure based on the input of Composite Graph API. So will click on the + icon, which will open the editor to define the input content structure. It also gives the option to create the document type based on an XML or a JSON sample. I will use a JSON sample to create the input format structure. Click on Load JSON.


Then select the document type and array as No.

Similarly will create the successful response (200) structure and possible error code (400) and corresponding structure. We can add more codes based on possible values it may return.

- Now the REST connector for Salesforce composite graph is ready. As the next step, you need to create an account and operations to use in your specific interface/integration. First, let’s create a new Account. For that please come back to the main page of REST connectors, select the new connector, and on the right side click on “New Account”.

As we selected Oauth 2.0, so while creating an account, we need to provide a base URL, consumer ID, secret, access token, refresh token, URL. You need to get these parameters from Salesforce. For other parameters in the account creation page, please keep the default. We can have multiple accounts for different Salesforce instances.


- Now will add operations for this connector. For that please come back again to the main page of REST connectors, select the new connector, and on the right side click on Operations.

On the next page click on New Operation.

Give the name of the operation and select the account created. When you will be using this operation in interfaces, you can select other accounts also based on your requirements.

Select the operation which we added as a resource earlier. Click on headers and select which headers fields are needed for this operation. For this one, we need only one header field, which is content-type.


Using this custom REST connector to call Salesforce composite graph API from interface code
Now this connector is ready to use for any interfaces for sending Composite graph request to Salesforce using Salesforce composite graph API.
- Let’s now use this new REST connector in a flow service.
Here is the simple flow service, which takes composite graph request as input and then calls the REST connector and gets the output response from Salesforce.
As the body of the composite graph API request is a free format structure, it can take any input based on specific requirements. We need to do the required mapping to create the structure based on the Salesforce objects we want to send as part of the request.

When calling the connector from the flow service. Select the operation and account we already created. You can create new custom operations or new accounts also.


I am passing the input mentioned as an example during the introduction section.

It returns the output from Salesforce as objects created successfully.
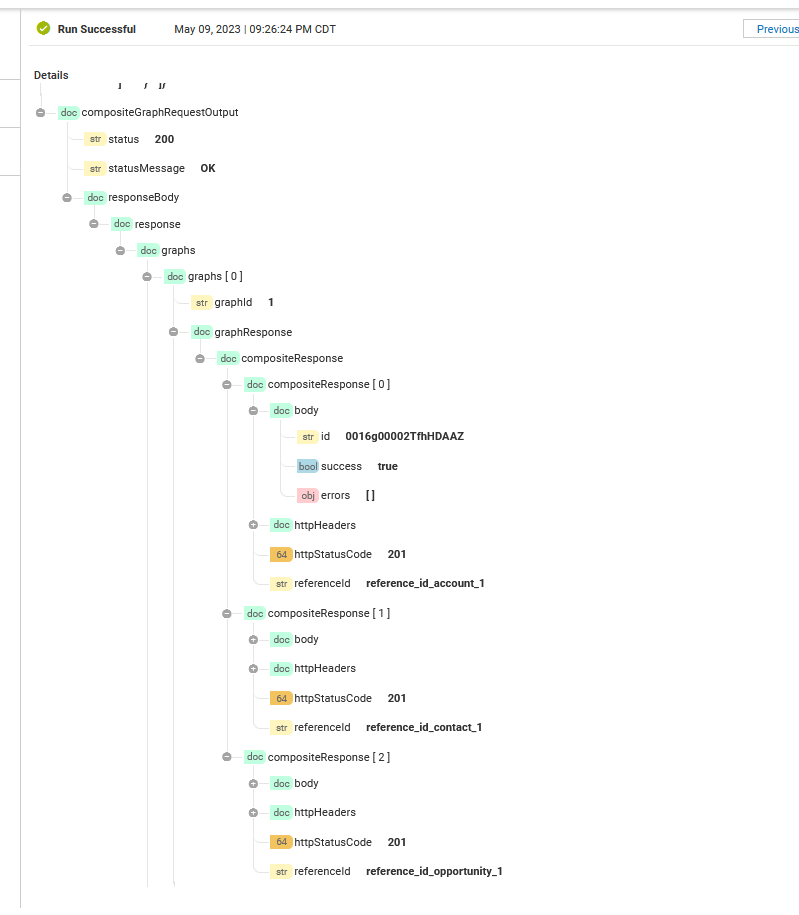
Here is the JSON format of the response received.
{
  "status": "200",
  "statusMessage": "OK",
  "responseBody": {
    "response": {
      "graphs": [
        {
          "graphId": "1",
          "graphResponse": {
            "compositeResponse": [
              {
                "body": {
                  "id": "0016g00002Tfh9jAAB",
                  "success": true,
                  "errors": []
                },
                "httpHeaders": {
                  "Location": "/services/data/v57.0/sobjects/Account/0016g00002Tfh9jAAB"
                },
                "httpStatusCode": 201,
                "referenceId": "reference_id_account_1"
              },
              {
                "body": {
                  "id": "0036g00002NiomUAAR",
                  "success": true,
                  "errors": []
                },
                "httpHeaders": {
                  "Location": "/services/data/v57.0/sobjects/Contact/0036g00002NiomUAAR"
                },
                "httpStatusCode": 201,
                "referenceId": "reference_id_contact_1"
              },
              {
                "body": {
                  "id": "0066g00003eFOLWAA4",
                  "success": true,
                  "errors": []
                },
                "httpHeaders": {
                  "Location": "/services/data/v57.0/sobjects/Opportunity/0066g00003eFOLWAA4"
                },
                "httpStatusCode": 201,
                "referenceId": "reference_id_opportunity_1"
              }
            ]
          },
          "isSuccessful": true
        },
        {
          "graphId": "2",
          "graphResponse": {
            "compositeResponse": [
              {
                "body": {
                  "id": "0016g00002Tfh9kAAB",
                  "success": true,
                  "errors": []
                },
                "httpHeaders": {
                  "Location": "/services/data/v57.0/sobjects/Account/0016g00002Tfh9kAAB"
                },
                "httpStatusCode": 201,
                "referenceId": "reference_id_account_2"
              },
              {
                "body": {
                  "id": "0036g00002NiomVAAR",
                  "success": true,
                  "errors": []
                },
                "httpHeaders": {
                  "Location": "/services/data/v57.0/sobjects/Contact/0036g00002NiomVAAR"
                },
                "httpStatusCode": 201,
                "referenceId": "reference_id_contact_2"
              }
            ]
          },
          "isSuccessful": true
        }
      ]
    }
  }
}
Verifying Composite graph API call is successful from Salesforce
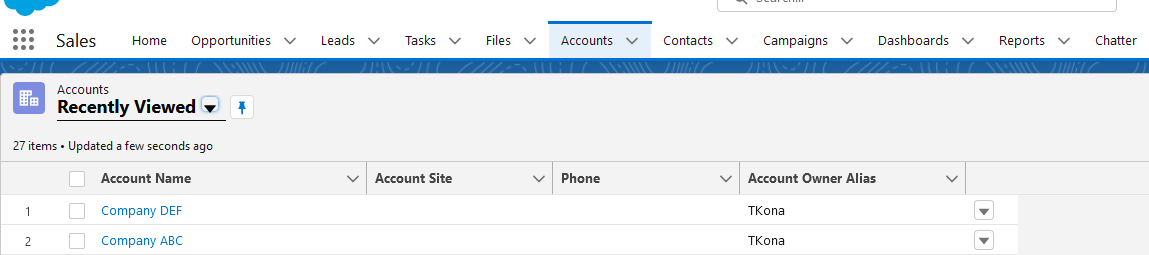
- Verifying all objects created in Salesforce.
Both accounts were created.
Contacts created.

Contact and Opportunity linked to Account as per Graph1.

Second contact is associated with the second account as per Graph 2.

Useful links | Relevant resources
REST connector - Custom Connectors - webMethods.io Integration
You can also build any custom connector using Connector Builder - Node.js CLI- Connector Builder - Node.js CLI - webMethods.io Integration
If you are new to
webMethods.io, this article can provide you with a good starting point - Getting Started with webMethods.io: A Beginner's Guide


